- 15일차 프론트엔드 공부 -
함수
calc()
괄호 안의 사칙연산을 수행한 결과를 속성값으로 사용한다.
ex)
.item {
width : clac(100/4px);
}
.item2 {
width : clac(10px + 20px)
}
+, - 앞과 뒤는 띄어쓰기가 필수다.
*, / 는 띄어쓰기가 필요 없다.
함수 실습1
<!DOCTYPE html>
<html lang="ko">
<head>
    <title>Document</title>
    <link rel="stylesheet" href="./index.css">
</head>
<body>
    <div class="box">
        <span class="text">
            20px + 50%
        </span>
        <div class="item1"></div>
    </div>
    <div class="box">
        <span class="text"></span>
            100% - 70px
        </span>
        <div class="item2"></div>
    </div>
    <div class="box">
        <span class="text"></span>
            3 * 20px
        </span>
        <div class="item3"></div>
    </div>
    <div class="box">
        <span class="text"></span>
            100% / 4
        </span>
        <div class="item4"></div>
    </div>
</body>
</html>
* {
    box-sizing: border-box;
}

.box {
    border: 1px solid red;
    margin-bottom: 30px;
    padding: 30px;
}

.text {
    font-weight: 500;
    font-size: 20px;
}

.item1 {
    background-color: red;
    width: calc(20px + 50%);
    height: 50px;
}

.item2 {
    background-color: green;
    width: calc(100% - 70px);
    height: 50px;
}

.item3 {
    background-color: blue;
    width: calc(3 * 20px);
    height: 50px;
}

.item4 {
    background-color: orange;
    width: calc(100% / 4);
    height: 50px;
}

함수 실습2
<!DOCTYPE html>
<html lang="ko">
<head>
    <title>Document</title>
    <link rel="stylesheet" href="./index.css">
</head>
<body>
    <div class="container">
        <div class="sidebar">
            <ul>
                <li>메뉴1</li>
                <li>메뉴2</li>
                <li>메뉴3</li>
                <li>메뉴4</li>
            </ul>
        </div>
        <div class="contents">
            <div class="item">상품</div>
            <div class="item">상품</div>
            <div class="item">상품</div>
            <div class="item">상품</div>
            <div class="item">상품</div>
            <div class="item">상품</div>
            <div class="item">상품</div>
            <div class="item">상품</div>
        </div>
    </div>
</body>
</html>
* {
    box-sizing: border-box;
}

.container {
    display: flex;
    flex-direction: row;
    justify-content: space-between;
    align-items: flex-start;
}

.sidebar {
    width: 170px;
    background-color: orange;
    padding: 5px 15px;
}

.sidebar ul {
    width: 100%;
    padding: 0;
}

.sidebar ul li {
    list-style: none;
    padding: 5px 0;
    color: #ffffff;
    border-bottom: 1px dashed rgba(255, 255, 255, 0.5);
}

.contents {
    width: calc(100% - 170px);
    display: flex;
    flex-direction: row;
    justify-content: space-between;
    align-items: flex-end;
    flex-wrap: wrap;
    padding: 0 10px;
}

.item {
    width: 24%;
    height: 180px;
    background-image: url("../img/dochi.jpg");
    margin-bottom: 10px;
    background-size: cover;
}

position
HTML 요소가 배치되는 방식을 결정하는 속성
position 속성값
static (기본값)
relative
absolute
fixed
sticky
top / left / bottom / right
해당 방향 기준으로 요소의 좌표값을 변경한다.
position: static
요소를 문서상 원래 있어야 하는 위치에 배치된다.
top / left / bottom / right 적용 불가
position: relative
원래 있던 자리를 기준으로 요소의 위치를 조정할 수 있다.
top / left / bottom / right 적용 불가
position: absolute
절대 좌표를 기준으로 요소의 위치를 조정할 수 있다.
top / left / bottom / right 적용 불가
absolute 실습
<!DOCTYPE html>
<html lang="ko">
<head>
    <title>Document</title>
    <link rel="stylesheet" href="./index.css">
</head>
<body>
    <div class="container">
        여기는 컨테이너입니다.
        <div class="wrapper">
            여기는 컨테이너 안 입니다.
            <div class="item">
                여기는 가장 안쪽의 아이템 박스입니다.
            </div>
        </div>
    </div>
</body>
</html>
* {
    box-sizing: border-box;
}

.container {
    border: 3px solid red;
    padding: 10px;
    position: relative;
}

.wrapper {
    border: 3px solid blue;
    padding: 10px;
    position: relative;
}

.item {
    width: 200px;
    height: 100px;
    background-color: orange;
    position: absolute;
    top: 10px;
    left: 10px;
}

position: fixed
스크롤과 무관하게 뷰포트를 기준으로 요소의 위치를 설정할 수 있다. (스크롤을 해도 계속 남아있는 것)
기준 : viewport
position: sticky
요소의 원래 위치에 있다가 스크롤을 내려가면 지정한 좌표에 고정됩니다.(static 과 fixed가 합쳐는 방식)
기준 : 부모 요소의 좌표
z-index
여러개의 요소가 겹쳐져 있을 때, 무엇이 앞으로 나올지 결정하는 속성
기본값 : auto
ex) z-index: 1, z-index: 2
숫자가 클수록 앞으로 나온다.
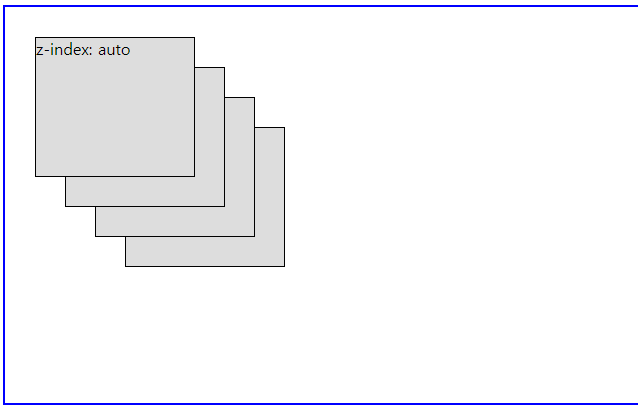
z-index 실습
<!DOCTYPE html>
<html lang="en">
<head>
    <title>Document</title>
    <link rel="stylesheet" href="./index.css">
</head>
<body>
    <div class="container">
        <div class="item item1">
            z-index: 4
        </div>
        <div class="item item2">
            z-index: 2
        </div>
        <div class="item item3">
            z-index: 1
        </div>
        <div class="item item4">
            z-index: auto
        </div>
    </div>
</body>
</html>
* {
box-sizing: border-box;
}
.container {
width: 100%;
height: 400px;
border: 2px solid blue;
padding: 30px;
}
.item {
width: 160px;
height: 140px;
border: 1px solid black;
background-color: #dddddd;
}
.item1 {
position: relative;
z-index: 4;
}
.item2 {
position: absolute;
top: 70px;
left: 70px;
z-index: 2;
}
.item3 {
position: absolute;
top: 100px;
left: 100px;
z-index: 1;
}
.item4 {
position: absolute;
top: 130px;
left: 130px;
z-index: auto;
}

transition
css 속성을 이용한 변화의 전, 후 사이에 애니메이션을 추가해서 움직임을 부드럽게 만들어 줄 수 있습니다.
transition-property
어떠한 속성에 transition을 적용할 것인지 지정한다.
transition-property: color, transition
transition-duration
transition에 걸리는 시간을 지정한다.
transition-duration: 0.2s
transition-timing-function
transition의 속도 패턴을 지정한다.
transition-timing-function: ease-in-out
linear : 일정한 속도로 변화한다다.
ease : 시작할때는 빨라지다 느려진다다.
ease-in : 천천히 시작했다가 속도를 높여 끝난다.
ease-out : 빠른 속도로 시작했다가, 천천히 끝난다.
ease-in-out : 천천히 시작했다가, 정상 속도가 됐다가, 빠르게 끝난다.
transition-delay
transition 요청을 받은 후, 실제로 실행되기까지 기다려야하는 시간의 양을 지정한다.
transition-delay: 2s
transition 단축 속성
transition: color 0.4s ease-in-out 1s
transition: property duration timing-function delay
'프론트엔드 공부 > CSS 기초' 카테고리의 다른 글
| 17일차 프론트엔드 공부 - animation (0) | 2024.09.22 |
|---|---|
| 16일차 프론트엔드 공부 - transform (0) | 2024.09.21 |
| 14일차 프론트엔드 공부 - 폰트, 단위 (0) | 2024.09.12 |
| 13일차 프론트엔드 공부 - 폰트, 단위 (1) | 2024.09.11 |
| 12일차 프론트엔드 공부 - Float, Flex (0) | 2024.09.10 |